| Upgrade Guide using the PowerSpec Windows 8 Disks |
The following instructions are for installing Windows 8 using the media provided with the system.
1- The Windows 8 Disk
2- The Windows 8 Drivers & Updates Disk
Note:
Some of the PowerSpec models do not come with a Drivers and Updates disk.
If your system came with the 8P641.0C Windows 8 Pro Recovery DVD, the drivers have been preinstalled to the recovery image.
The Drivers and Updates disk is not required for these systems.
We suggest printing this page to use during installation.
Before you start the upgrade... |
- Only a CLEAN INSTALL is possible using these disks
- Back up all of your data to an external drive
You can use Windows Easy Transfer (Click Start and type 'Easy') and click 'Windows Easy Transfer'
- Important:
Windows 8 does not include "DVD playback" software for viewing movies and videos
- Visit you local Micro Center to purchase software for viewing movies and videos with Windows 8
|
| Install the Windows 8 Operating System |
- Insert the Win 8 Pro Recovery disk into the optical drive
- Shutdown Windows 7
- Turn the system back on and press any key when prompted to boot the Recovery disk
- User will see a window (this will take several minutes), then the Windows Setup menu
The hard disk partitions must be removed before installing Windows 8
- Select Next, then Click on "Drive Options Advanced"
- Click Delete on the main Windows partition, and also Delete the 200MB partition
- Click Next, (this starts installing Windows 8) (This will take about 25 minutes)
- The system Reboots, shows Getting Ready
- The system Reboots again, shows Personalize, select a color scheme
- Then enter a PC name
- Select a Wireless network or you can select one later
- Select Use express settings
- Sign in screen, you can select Microsoft account or sign in without a Microsoft account
- Sign in screen again, Microsoft Account or Local Account.
- Type in a user name, then Finish.
- “Getting Ready” starts
|
| Install the drivers... |
Note:
Some of the PowerSpec models do not come with a Drivers and Updates disk.
If your system came with the 8P641.0C Windows 8 Pro Recovery DVD, the drivers have been preinstalled to the recovery image.
The Drivers and Updates disk is not required for these systems and you can skip this step.
- After Windows 8 has been installed, the drivers need to be installed using the Drivers and Updates disk
- Insert the Drivers and Updates disk and press OK
- In the upper right corner of the screen, an action prompt will appear

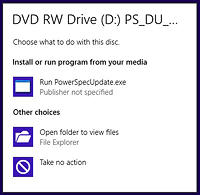
- Select 'Run PowerSpecUpdate.exe'
Note: If the prompt does not appear...
- From the Start screen, Select the Desktop, then File Explorer folder from the task bar
- Select Computer, double click the DVD drive, right click 'PowerSpecUpdate'
- Select 'Run as administrator', then click Yes
- Click 'Install All' and the drivers and updates will be installed
- The Window closes when finished but doesn't eject the disk
- Manually eject the disk
- Restart the system
|
| Restore System Settings and Reinstall Applications |
- If you used Windows Easy Transfer...
- Press the Windows Key and on the Windows 8 Start screen type "easy"
- Start Windows Easy Transfer
- Follow the instructions to restore your data and settings
- Reinstall your applications from the original source
|
|

Windows 8
Beautiful, fast, fluid
Reimagined
From start to finish, we’ve reimagined Windows. It’s designed to work the way you do and keep you connected to the people, websites, and things you love most.
Personalized
Smooth and intuitive, the beautiful new Start screen gives you instant access to the things you care most about. Organize and customize it the way you want.
Rock solid
Built on the rock-solid foundation of Windows 7 and even more secure with safer browsing, account protection, and parental controls. Your Windows 8 PC starts up quickly and apps run faster.
LEARN MORE » |